- 2 x 20 cm, 2 x 37 cm en 1 x 250 cm seatbelt webbing 2.5 cm wide
- 2 x 65 cm en 5 x 15 cm seatbelt webbing 5.0 cm wide
- 4 plastic buckle's (from one piece of plastic, not two parts!!!)
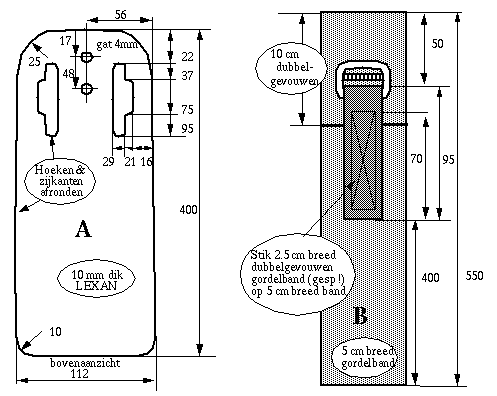
- 1 sheet LEXAN 112 x 400 x 10 mm
- 2 flat head popnails 1.5-2.0 cm long with Stainless steel rings or Stainlees steel bolt/nut/ring (popnail with
ring of head of bolt with 1 cm (big) diameter).
Notes to the drawings:
- Part A: the strange shape of the openings in A are needed to guide the buckle of part B
through. Or reshape into a 73 x 8 mm opening and sew the buckle on later.
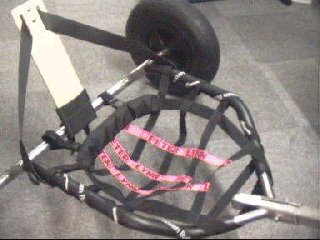
Smooth all edges and curves. See foto.
- Part B: the buckle has its backside on the seatbelt webbing. See foto.
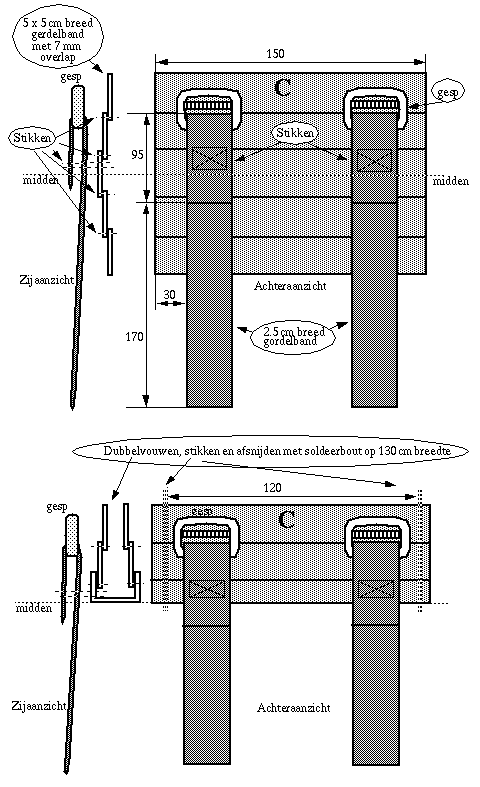
- Part C: the buckle has its frontside on the seatbelt webbing. See foto.
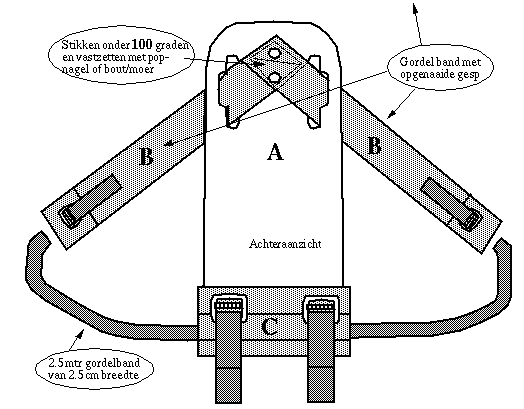
- Part A/C: Part A slides with firm pressure in C, no violance needed !!!.
How do you fit it to the buggy:
- Attach the assembled BackSupport with the buckle's (C) to the middle of the rear-axle. If you feel the buckle's
in your back when you sit then you attached it with the wrong side to your back. If you feel the popnails or the
nuts or the bolts then you made a mistake somewhere.
- Attach the 2.5 mtr long seatbeld webbing, 2.5 cm wide, to one of the buckle's of B (left or right).
- Guide this to the outside, of the frame-tube, of the buggy. The buckle is on the outside of the buggy. If the
buckle is between frametube and the 5 cm wide seatbelt webbing then you made a mistake.
- Wrap the seatbelt webbing (2.5 cm wide) around the frame tube going from one side of the buggy passing the
downtube to the other side. Attach the end to the other free buckle on B. If you have about 4-5 warps on the left
and on the right frametube then you did OK. Again if one of the buckle's of B is between the frametube and the 5 cm
wide seatbelt webbing then you made a mistake.
- Sit in the buggy and lean backwards. Adjust the 2.5 mtr long seatbeld webbing using the buckle's on B until you
sit comfortable. I only sit a little backwards.
Common notes & tips:
- The original design is protected by a french patent. Like the Speedwing.
- The drawings are just "look-a-like" drawings. Don't take measures from it. Mail me if you don't know
how.
- The bolts/popnails must have a big flat head. They keep the webbing fixed to the LEXAN and have to stand the
forces when you lean back and/or sit sideways.
Remember the sharp edges always point backwards and not to your back !
- LEXAN is stable toward scratches and breaking, but also expensive.
I used WOOD: multiplex, with about 7-9 layers which in total is about 1 cm thick (Paint it). Plexiglas or akryl is
UNRELIABLE and breaks like glas, NEVER use it !!!!. Aluminium is not seawaterproof and comes of black.
- Add a backpack to your Spring in the Back. For food, a drink or/and spare kite and lines. And drive the whole
day.
- In strong winds the "Spring Back" will fall down on the seat. This is always annoying. The problem was solved
by a piece of coarse, self-adhesive and reinforced tape together with 1.5 meter 3mm thick shockcord. Put the piece
of reinforced self-adhesive tape, with coarse surface, in the middle of rear-axle. The shockcord is guided through
both openings in A and attached to the tube-in-tube on the rear-axle (wrapped backwards over the rear-axle). The
shockcord pulls the support backwards and the coarse tape prevents it from easy sliding over the rear-axle.
- If you are longer then 185 cm or your hips are wider then 45 cm (more then 100 cm all around) then you might
consider building the springback longer and wider. This is because you probably sit "on" the buggy while the
shorter and smaller persons sit "in" the buggy and thus the SpringBack reaches only halfway your back. Adjust
measures accordingly.
- 10 cm dubbel-gevouwen = folded double over 10 cm, Hoeken = corners, zijkanten = edges
- Afronden = make smooth, gat = hole, dik = thick,
- Stik(ken) = sew, popnagel = popnail , bout/moer = bolt/nut
- Gordelband = seatbelt webbing, gesp = buckle, midden = middle
- 100 graden = 100 degrees , Zijaanzicht = sideview , Achteraanzicht = backview