|
Update 11-December-2023. Read the Disclaimer.
On this page I have collected my experience with the TwoTrees Sapphire Plus V1.1 3D printer. Bought in juli 2021 for 420 Euro. I found them now on the internet for 370 Euro.
This printer has the Mks Robin nano V1.2 board with 5 TMC2225 drivers and has a dual Z-axis each with motor but coupled via a belt.
This page is not about how to assemble the Sapphire Plus. "Aurora Tech" and "Just Vlad" already have done that perfectly on Youtube. This page is about the problems I had and how I solved them.
The Sapphire Plus is not a 3D printer kit that requires a "one" hour of assembly and then prints perfectly ("out-of-the-box"). If you want that then better buy a Creality.
Assuming you don't make any mistakes and this is not your first 3D printer an 4-8 hour build is do-able but don't be suprised if it takes up to 60 hours with all kinds of suprices. Just read this page.
Careful and accurate assembly of each step is necessary. Then finally do some testing using the printer's menu (moving, homing, heating) to check that everything works.
- For all pre-assembled parts: tighten the bolts/screws.
- Grease the sliders/rails, they are dry. I used transparent grease for bicycle ball-bearings.
- The isolation pad for the heat bed is 20 x 20 cm while the heatbed is 30.5 x 30.5 cm . I used a 30x30 isolation pad.
- The wires of the extruder ventilator touch the extruder and heat block. The wires will melt if you do not add heat isolation but you have to dis-assemble it to do that.
Alternatively one could dis-assamble and re-assemble the extruder so that the extruder ventilator is at the back side and the wires don't touch any hot part.
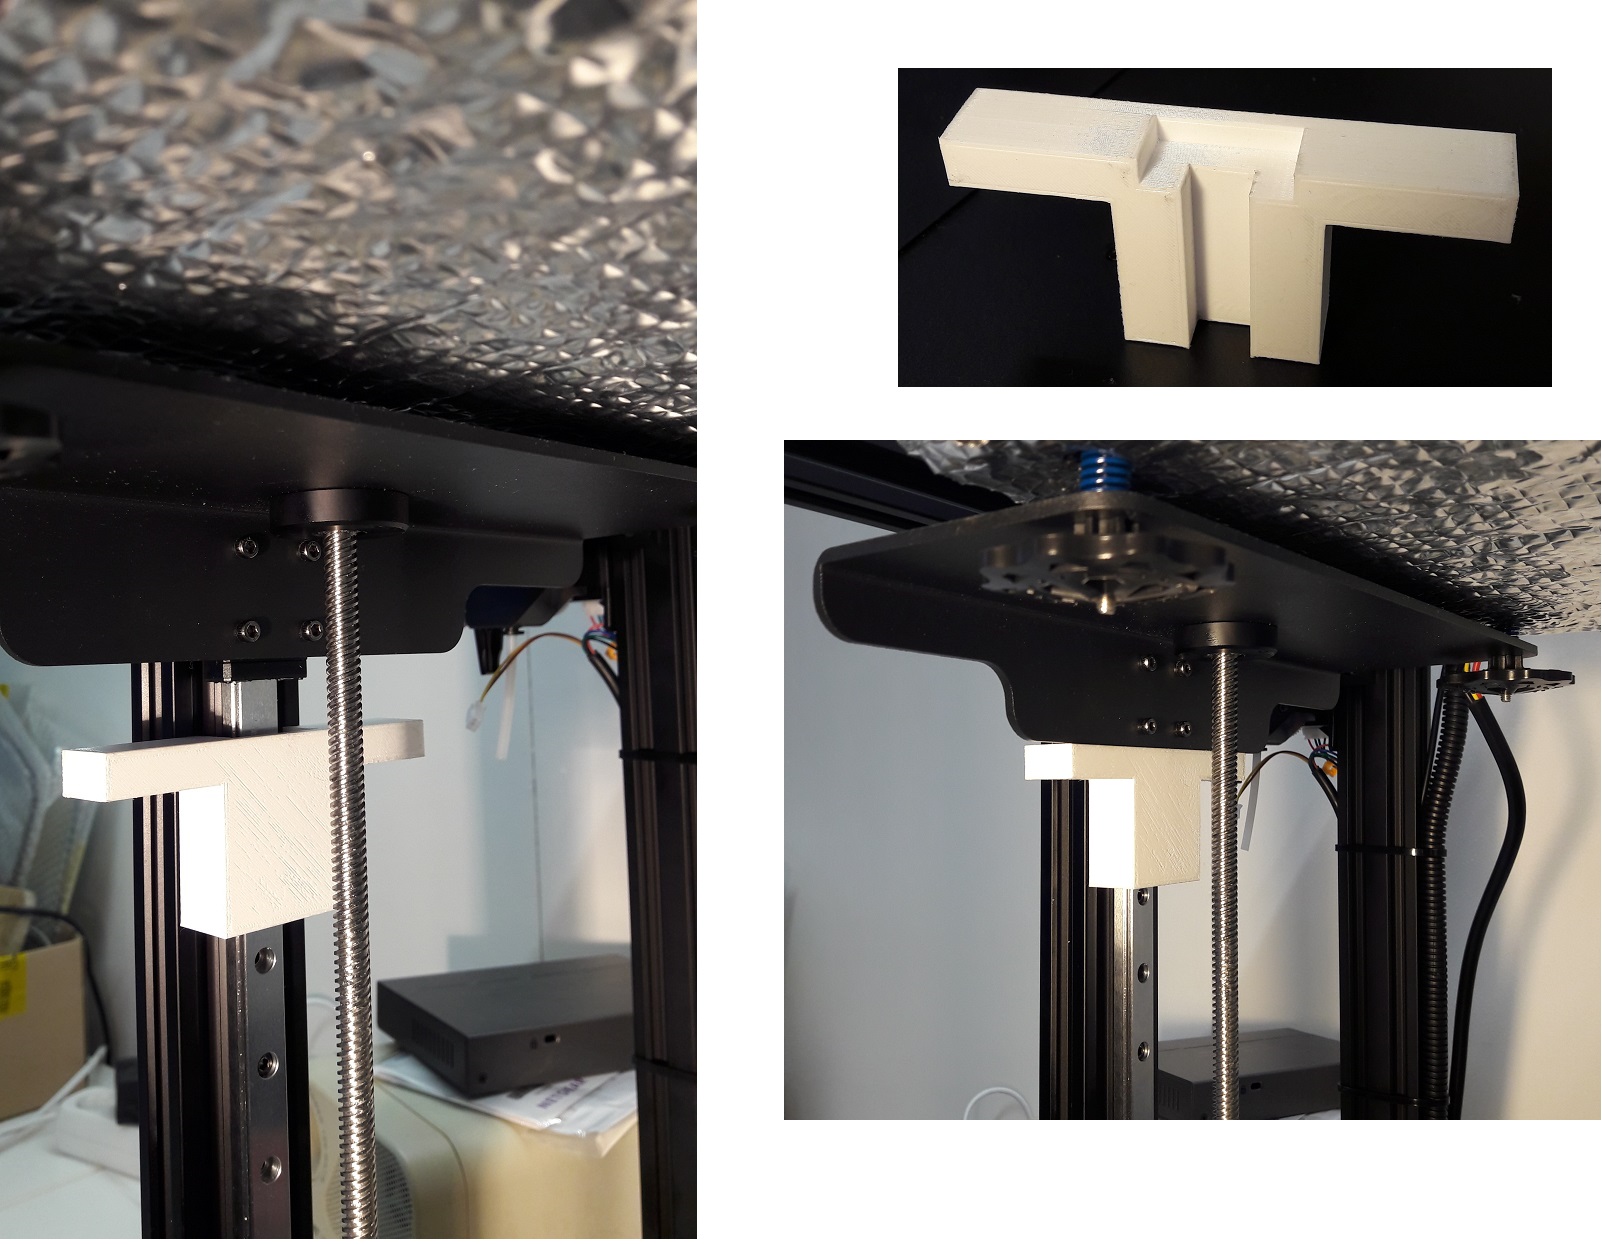
- You need a square tool to mount the "Hot Bed Platform Support" perpendicular to the Z-axis rails on the slider. If you don't the result can be that 1-2 corners of the heatbed cannot be leveled correctly.
I created an align tool that does the same (https://www.thingiverse.com/thing:4912441) but you need a 3D printed to print one.
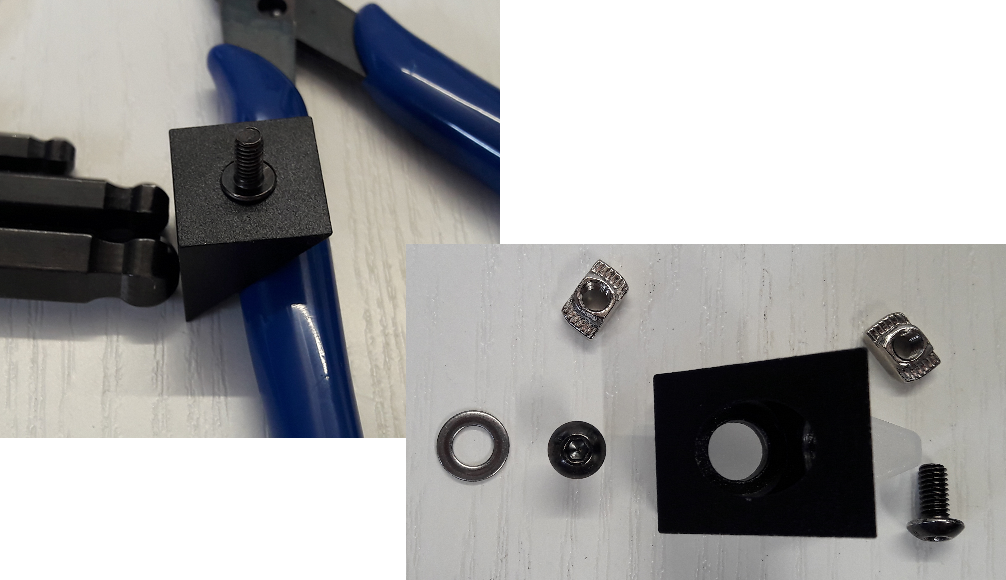
- The "Profile Fixed Corner" (the 4 corner brackets), each corner bracket has 2 holes with a diameter of 7.1-7.2 mm instead of 2 slots of 4 mm.
The provided M4x8 screws have a head with a diameter of 7.5 mm.
When you tighten a screw its pulled into the hole, gets stuck in the hole and the bracket doesn't fix anything.
To prevent that I used a M4 washer with each screw so the head of the screw is not pulled into the hole.
- The tension of the belts of the pre-assembled "Top frame" (X-Y axis) was sloppy and need to be adjusted.
- Warning: the "Screw fixing Seat" for fixing the Z-axis to the frame have each to be mounted at different heights.
The one with the stopper switch (right side) needs to be mounted lower then the one without (left side).
If you mount them both at the same height and "Home" the Z-axis, the left seat might run into the heatbed support bracket before the Z stopper switch is triggered.

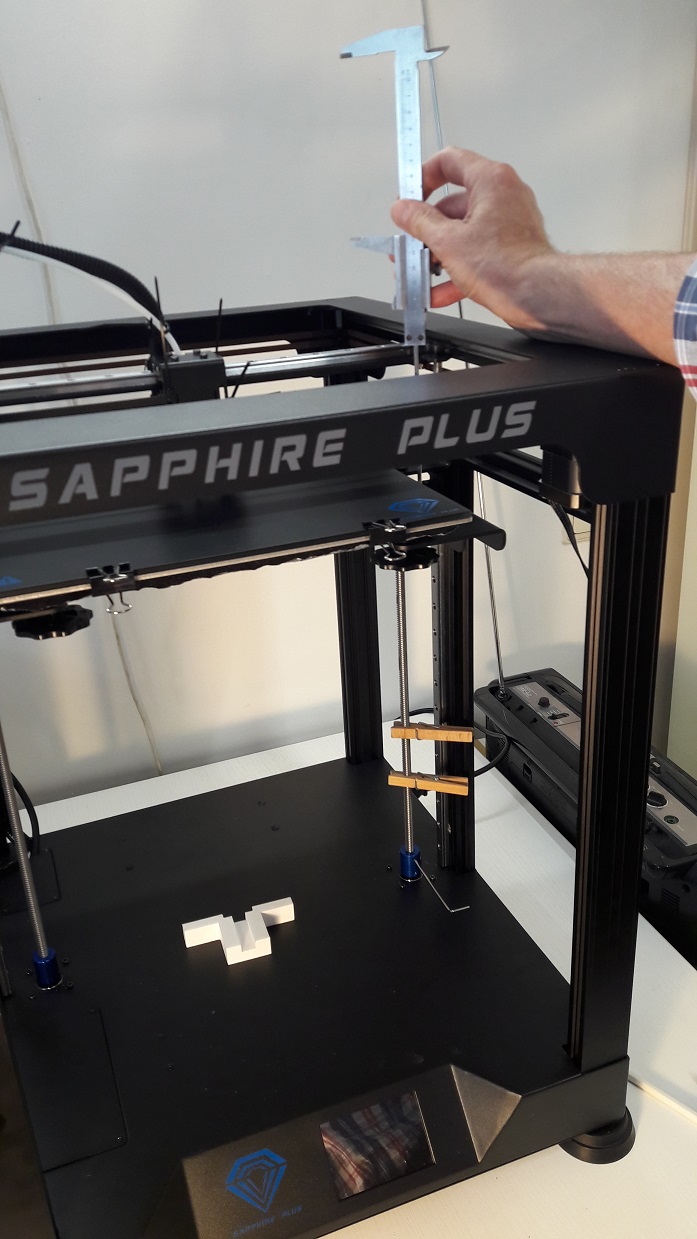
- Make sure the heatbed support brackets (thus not the heatbed !!) have the same distance to the X-Y rails or the top of the frame. Measure with a caliper that they both are at the same distance (as close as possible).
I used some clothespin to prevent the lead screw from turning when I tweaked it.
When left and right side differ too much you will notice that one slider slides perfectly while the other is hopping over the rail.
- Testing with help of the control panel or OctoPrint (temperature chart !!)...
Use OctoPrint for Linux, PC, Imac or Raspberry Pi. It is so much easier to find errors when testing.
This is just a test to see if everything works as I expect it to do (moves, heats, no strange noises, no smoke, etc).
- Test moving X, Y and Z 1.0 mm up and down then 1 cm and more
- test the stoppers with homing X, Y then Z
- test heating: heat bed at 80 degrees, hot end at 263 degrees
- heat bed leveling cold
- heat bed leveling with bed and hot end at desired print temperature for PLA,ABS or PETG.
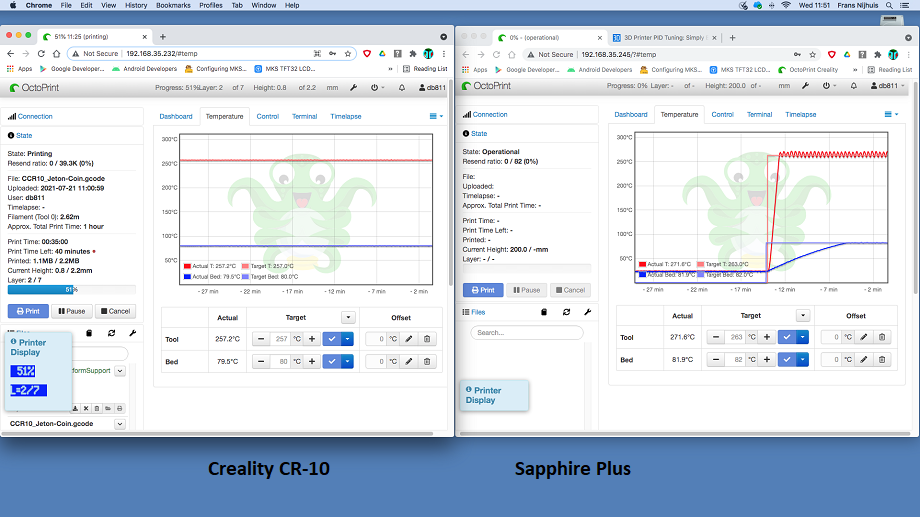
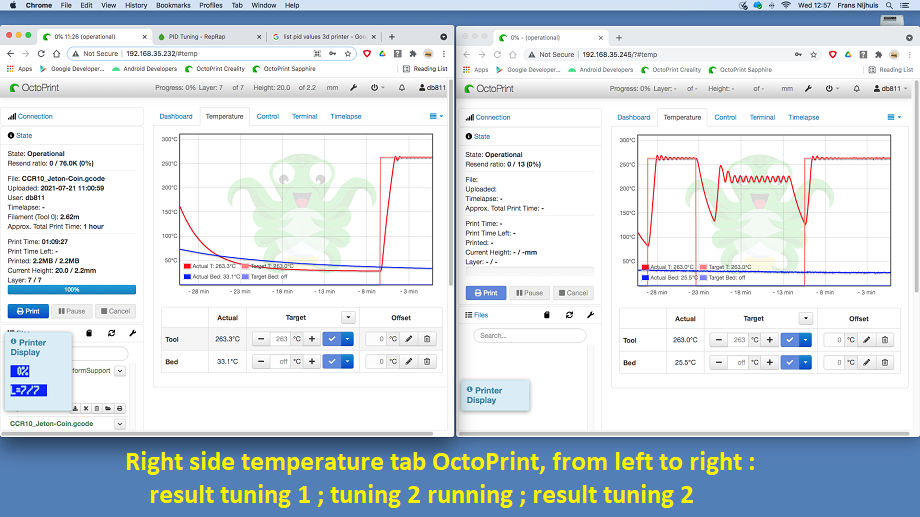
- Temperature test hot end failed.
Using OctoPrint I discovered taht the test to heat the hot end to 263 degrees failed, well the temperature is not constant. On the screenshot above: on the left side the Creality CR-10 printing with a stable temerature chart and
on the right side the Sapphire Plus just with the heating on at 263 degrees and very instable. This can be solved with PID tuning of the hot end. The "How to..." and more can be found at https://reprap.org/wiki/PID_Tuning.
The maximum hot end temperature is 275 degrees and you should stay at least 35 degrees below that because the PID tuning overshoots the temperature some 30 degrees.
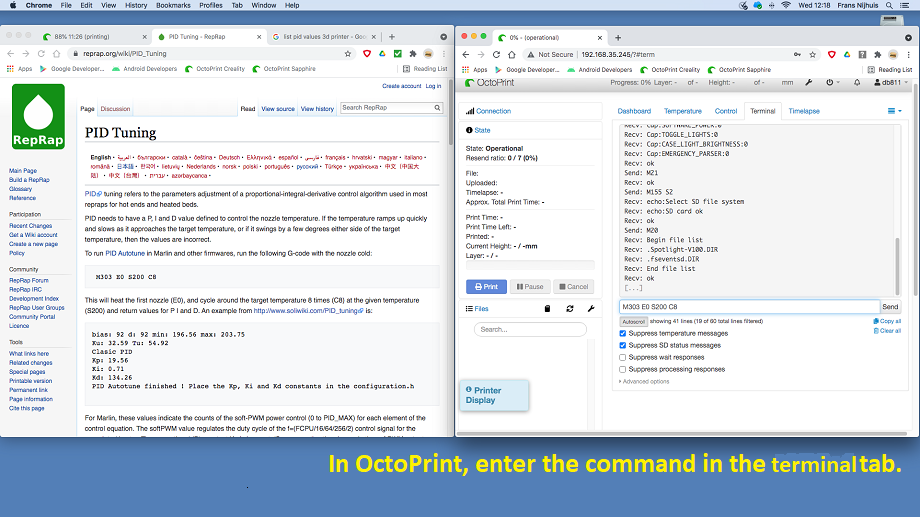
The 1st tuning is performed as suggested by RepRap "M303 E0 S200 C8" and the 2nd with "M303 E0 S220 C12" and wait untill the result is displayed (for Configuration.h).
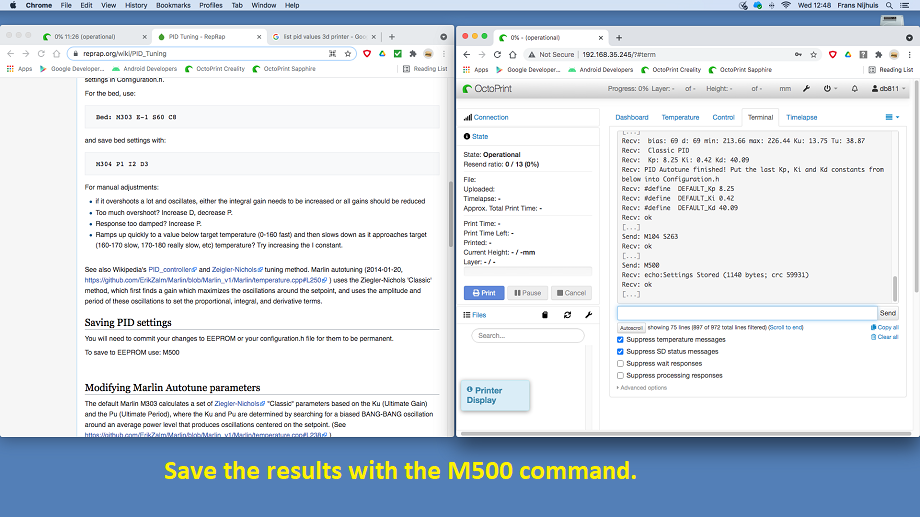
Then set the values with "M301 P<Kp value> I<Ki value> D<Kd value>" and saved them with the M500 command.
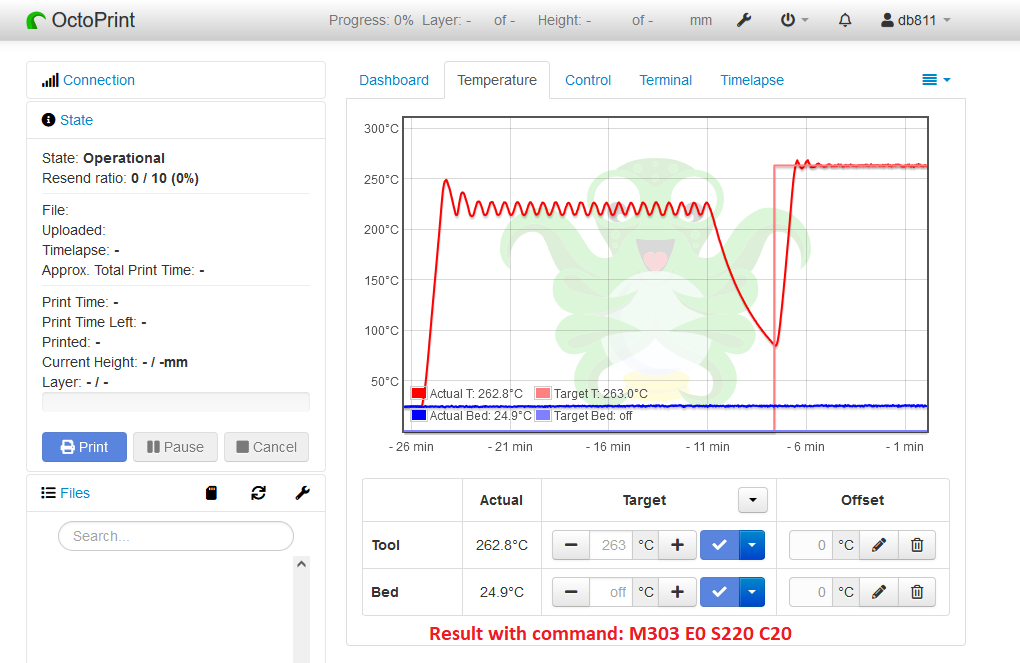
The result is still not as good as the Creality's chart. I repeated the test with "M303 E0 S220 C20" and the result is much better. Just remember replacing the thermistor could be a good idea and that pre-heating before printing is required.
The heat bed does not use PID control and heats just fine.
- Hot end clogged.
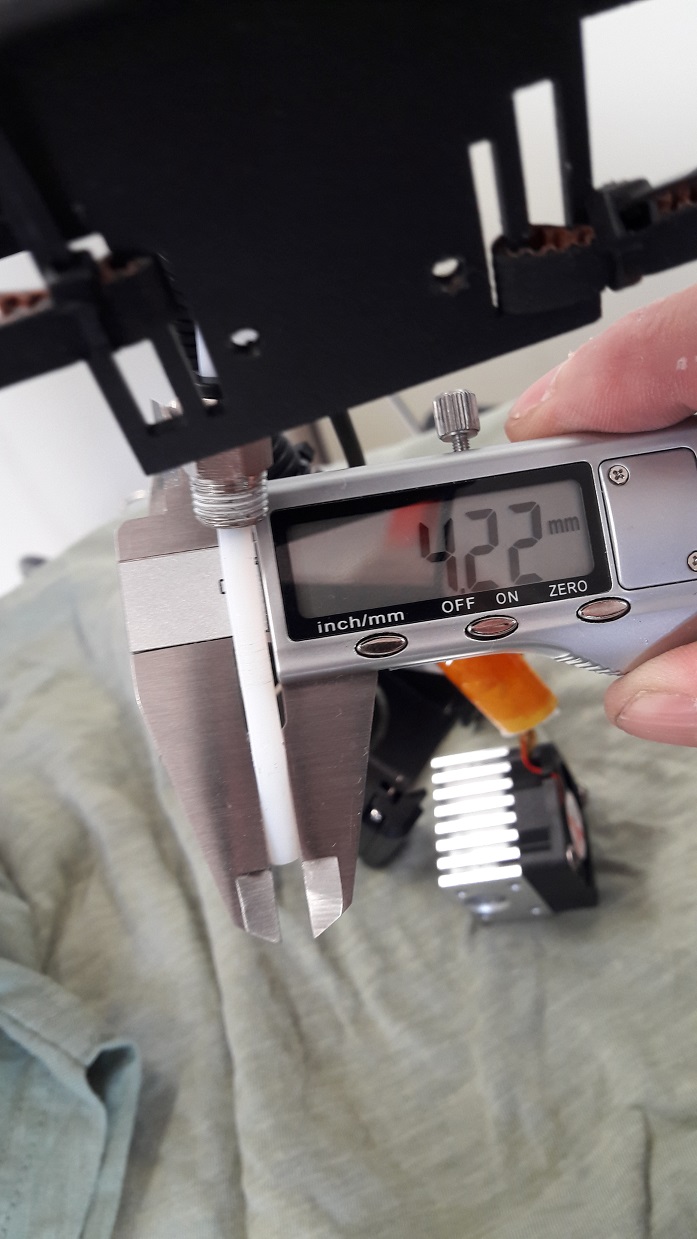
"Aurora tech" mentioned it in their video at 19:57 "a clogging hot end". My hot end also clogged. Why ? Because the PTFE tube was 15 mm short of the nozzle and is stuck in the heatbreak. Reason: The PTFE tube is 4.2 mm wide instead of 4.0 mm.
The heatbreak, through which the tube goes, is 4.0 mm wide. Some other PTFE tube, I already had some, fitted perfectly in the heatbreak. I sanded the TwoTrees tube down to 4.0 mm and then it went in up to the nozzle.
- Next: After testing its ready for a test-print and print an XYZ calibration cube https://www.thingiverse.com/thing:1278865.
- Manual bed leveling.
I used the manual bed leveling method with a paper. I searched in Cura and selected in Cura the profile for the Sapphire Plus printer, sliced the XYZ calibration cube and started printing. "Error reported by printer"... what ?
This is caused by the M420 command that is present in the "Start G-code" profile for this printer. I commented it out by putting ";" in front of the line. That solved the problem.
- Error: at some point while trying to print the XYZ calibration cube the "Start G-code" section caused the extruder to retract all filament present in the PTFE tube.
Stability problem of the MKS board or firmware ?
I go for the upgrade to the latest Marlin software (Check "Aurora Tech Part 2" and do not forget the PID tuning results.).
- Observation: the heat bed, when heated at 80 degrees Celsius, seems to be hollow.
This is 'known problem' and there is a fix for it at Youtube at https://www.youtube.com/watch?v=0j9fa86jiv0. If you are going for the 3D (BL) Touch then that upgrade should fix it too.
- Observation: the levelled heat bed seems to run away easily. If you are going for the 3D (BL) Touch then that upgrade should fix it too.
- Upgrade to the latest Marlin software from https://marlinfw.org/.
WARNING 1 TwoTrees has removed the official software for my version of the Sapphire Plus, NO SUPPORT anymore. Currently they have only a version for the Mks Nano V1.3 board !!!
WARNING 2: Marlin version 2.0.9.1 did not build for the modern GUI LVGL, it only builds for the classical and color Marlin interfaces.
I had problems with all build versions: display upside-down, steps/mm wrong, hot end max. at 260 degrees.
Some old values are stored in the board memory are not erased when new firmware is installed !! List, and copy/past into editor, the settings with command M503 and reset them with command M502 (Factory reset).
The tailored marlin files:
Configuration.h and Configuration_adv.h,
and the latest version 2.9.0.4 , also for 3D Touch, Configuration.h and Configuration_adv.h.
Currently there is a limit for the maximum hot end temperature at 260 degrees Celsius... but why ? HOTEND_OVERSHOOT=15, HEATER_0_MAXTEMP=275 so temperatures above MAXTEMP - OVERSHOOT are forbidden !!!
So the max is 275 - 15 = 260. Problem solved when you set HEATER_0_MAXTEMP=290.
Does https://github.com/makerbase-mks/MKS-Robin-Nano-V1.X build for the Sapphire Plus...? No.
- Add "3D Touch" from TwoTrees.
You need to several patches for the Marlin firmware,
check https://www.youtube.com/watch?v=GbHsNCDrTpY from Aurora Tech video part 2
and https://www.youtube.com/watch?v=eF060dBEnfs from Teaching Tech
(BLtouch for any 3D printer - Comprehensive step by step guide) and his page at
https://teachingtechyt.github.io/upgrades.html#bltouch and this page https://3dprintscape.com/z-offset-wizard-complete-guide/.
Then I installed in OctoPrint the Bed Level Visualizor, see https://plugins.octoprint.org/plugins/bedlevelvisualizer/.
- How to select the correct print temperature for a new filament using a temperature tower ?
Check this great "How to" video https://www.youtube.com/watch?v=EAG_538k_bM using Cura. It requires a (free) Cura plugin "Calibrate Shapes".
- HotEnd temperature fluctuations and temperature run away errors (july 2022)
Everything was working without problems but after changing filament the printing problems began with hotend temperature fluctuations, as if it was 'pid tuning', and sometimes even a run away error.
PID tuning did not fix it, and a 1000uF capacitor did not help either.
I tried the following with bed and hotend at operating temperature :
- PID tuning, result: just fine but the problem shows only when I start printing
- automatic bed leveling, steady temperature in OctoPrint thus its not some bad connection or wire
- extruding filament while the hot end is parked in the centre bed position... seems to have just visible fluctuations
- added a 1000 uF Elco to the 5 Volt ( see https://www.youtube.com/watch?v=qCtL0Yd_w0I by Teching Tech: Two easy fixes for 3D printer temperature swings ), result: no change
- update Marlin from 2.0.9.1 to 2.0.9.4, latest files: Configuration.h and Configuration_adv.h.
Then I noticed these swings only happen when the room temperature is above 25-27 degrees Celsius and while printing.
A test with a blower pointed at the control board showed almost direct some effect on the temperature swings.
In the printer the air flow seems to be blocked by wires and wrongly mounted heatsinks wrt the airflow. The hatsinks of the drivers cannot be changed, they fit only as they are fitted. I will change the wiring and also add extra ventilator(s).
- wires and air flow... re-route wires where possible
- add 2 ventilators for control board, see Thingiverse.com https://www.thingiverse.com/thing:5436573
Then I disassembled the hotend and discovered that the heat cartridge sits loose in the heater block, the lock bolt does not and will not lock the cartridge!!! The PTFE tube can not be removed, its 'hot glued' inside to the heatbreak.
OEPS... Time to change the hotend and select one where the PTFE tube stops in the heat sink and does run through the heatbreak to the nozzle.
I hope I can re-use the hotend mount, using a M12 threaded heatsink, and its ventilators. The E3D REVO is too expensive (with a 5V ventilator ?) so I ordered the following parts from TriangleLab:
- V6 M12 Threaded Heatsink for v6 hotend Remote OR Short range 1.75MM ,
- V6 titanium alloy heat break for V6 HOTEND heater block 1.75MM ,
- CHC KIT ceramic heating core quick heating M6 thread universal for ender 3 V6 hotend 24V,
They have a CHC Hotend mini but I estimate its too short for the original mount.
Its 20 july thus the parts will arrive somewhere in august... waiting...
Also ordered All Metal Bimetal Heatbreak Copper Titanium TC4 Throat High Temperature for Creality...
which fits the heatblock but is 4.5 mm too long.
Meanwhile I changed the temperature sensor to a Semitec 104GT thermistor, (#TEMP_SENSOR_N 5) which can reach 280-300 degrees Celsius, and changed the standard PTFE tube for a Capricorn PTFE tube.
All items from Aliexpress arrived within a week, so now I wait for a reason to install them.
- Upgrade to Marlin 2.1.2.1 (August 2023)
Before upgrading the firmware retrieve the current settings from the firmware with the M503 command. The values are needed for the configuration files.
Download Marlin firmware from https://marlinfw.org/.
The 3 tailored Marlin configuration files for the Two Trees Sapphire Plus, including 3D Touch:
platformio.ini and
Configuration.h and
Configuration_adv.h.
After the firmware upgrade some calibrating maybe required, at least some checks that all went OK. There are many videos on youtube about this but, as always, TeachingTech is the clearest and completest,
his instructions at https://teachingtechyt.github.io/calibration.html
and the introduction video at https://www.youtube.com/watch?v=rp3r921DBGI&t=19s.
Pid tuning, temp checks, step rate check, etc.
- Upgrade power supply to a 600W version
To do something about the extruder temperature swings I upgraded the power supply from 360W to 600W. Result: some improvement but its not solved.
- Found this recent (july 2023) video about the SP-5 https://www.youtube.com/watch?v=0jpHzNiwGTA.
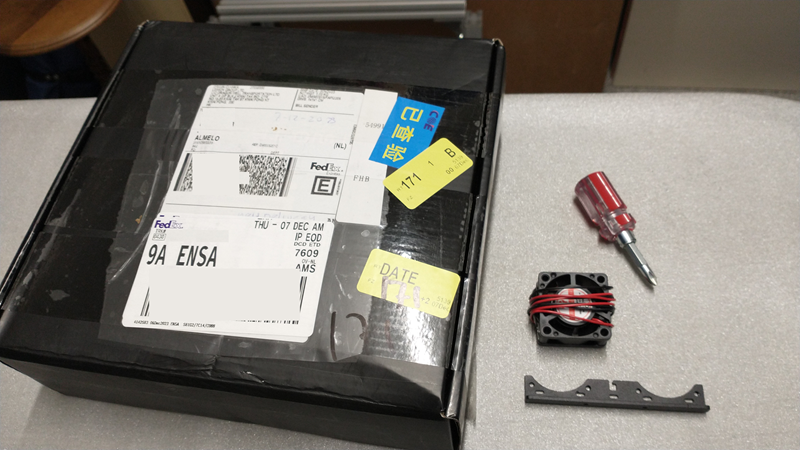
- Bought, including tax 94 Euro, the High Speed Printing Kit for the SP-5 https://www.twotrees3dofficial.com/products/high-speed-printing-kit-for-sp-5 (November 2023).
This converts the printer from bowden drive to direct drive and includes a faster controller board.
Installation video: https://www.youtube.com/watch?v=Hw1yPuwIhtc.
Mks Robin nano V3.1 documentation on GitHub
https://github.com/makerbase-mks/MKS-Robin-Nano-V3.X?spm=a2g0o.detail.1000023.2.391e214eorkJaT&file=MKS-Robin-Nano-V3.X
Notes (december 2023):
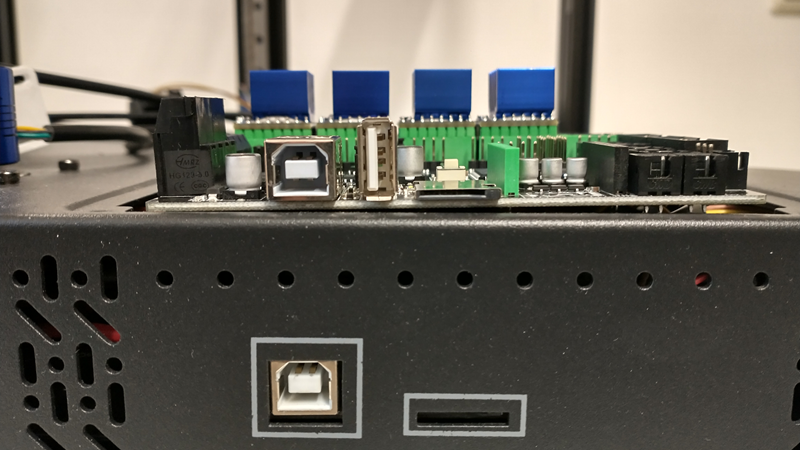
- The printer chassis is missing a hole for the USB stick, see photo.
- not shown on the TT web page: 2nd ventilator + mount clamp for cooling controller board
- not shown on the TT web page: the drivers + cooling block are included, assuming TMC2225 drivers
- not very clear in the video: the internal extension cables for extruder stepper and 'run out' of filament sensor
- Although they were already mounted correctly, the driver heatsinks block the air flow of the ventilators...
- all tools and new screws included
- the provided screwdriver (Philips and normal) does not fit any screws
- missing: a chassis part for mounting the ptfe tube to the chassis, replacing the bowden extruder.
- it is easier to install the belts just after mounting the metal carriage
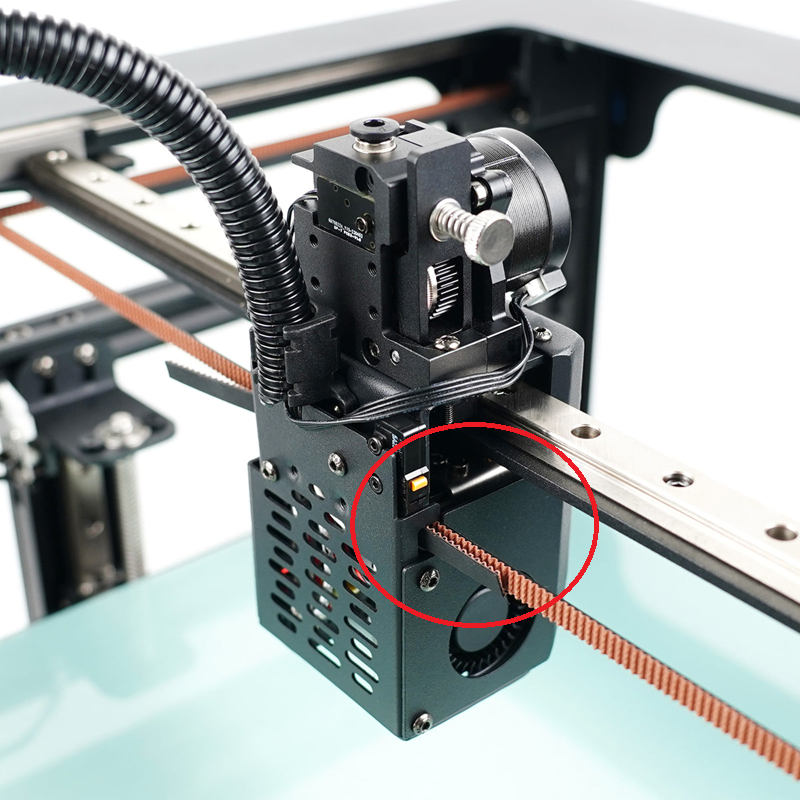
- problem: the belt prevents the X stop switch to trigger, see photo. Solution: fold the belt back in the extruder housing
- 3d Touch mounts nicely at the back instead of the front but it is not supported in the installed firmware
- Installed Marlin firmware is a minimum version, there are much more features available in Marlin
- Listing of M503 command of the installed firmware of MKS Robin Nano V3.1 : M503.txt
- First impression: the MKS TS35 V2.0 display with TFT_LVGL_UI feels slower compared to a TFT_COLOR_UI display
- (12 december 2023)X, Y, Z, E0 steps/mm OK
- ToDo (11 december 2023)... check the current settings, PID temp tuning, ...? , first print
- problem: when the ptfe tube is mounted to the direct drive something blocks the filament while trying to push it through the extruder...
The 3 tailored Marlin 2.1.2.1 configuration files, with 3D Touch, UART_MODE and TFT_COLOR_UI, for the Mks Robin Nano V3.1 with MKS TS35 V2.0:
platformio.ini and
Configuration.h and
Configuration_adv.h.
All driver jumpers were all correctly mounted on the board.
|