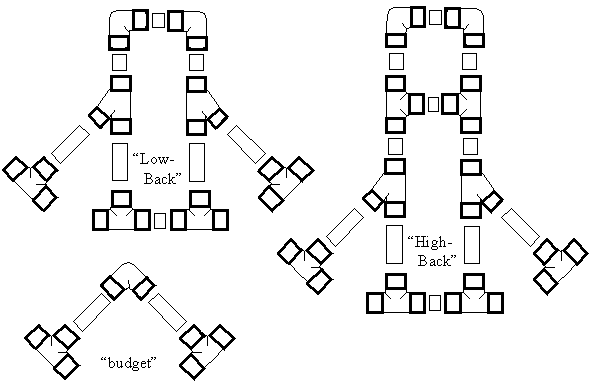
After I saw Ken Serack's PVC buggy I thought "Yes, The PVC Back !!".
So I made one in PVC for my Peter Lynn Competition buggy.
The finished PVC Back slides over the frame connectors, on the rear-axle, and CLICK'S onto therear-axle.
And ready ! Nothing to tie up.
But it is HARD like a rock. Feel every bump or use an extra pillow for your back.
Unfortunatly the PVC is also
UNRELIABLE !!!!
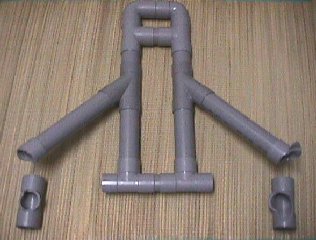
The T-fittings of the legs both brook at the same time at the buggy beach on Fanø.
For your own safety forget this design and build the Spring in the Back.
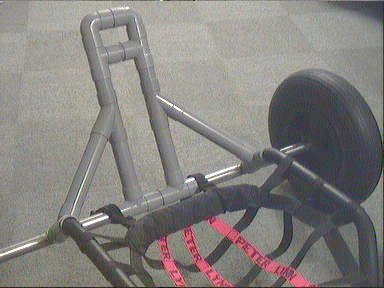
To my knowledge this PVC Back fits only to Competition type of buggy's. The frame connection to the rear-axle must
be perpendicular and should mount/dismount like a tube-in-tube connection. It certainly DOES NOT fit to the Peter
Lynn Classic buggy.
Used Materials & Tools:
- 1.5 meter of 40 x 3.2 mm PVC 40/40 tube.
- 6xT, 2xT(45 degrees), 2xL(90 degrees) fittings, all in 3.2 mm PVC 40/40.
- hard PVC glue (Colle PVC rigide).
- de-greaser (alcohol or aceton)
- one saw, fine sand paper, a 30 cm ruler and a pencil.
Notes:
- Grind the contact area's and clean then with alcohol or aceton.
- Leave the total assamblied and glued parts for several days to REST before you stress them.
- Smooth'n sharp edges.
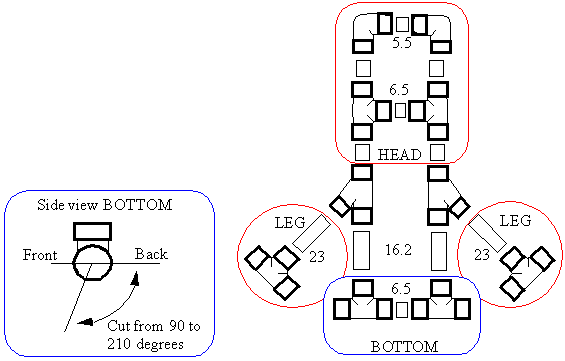
- ALL open connectors (T-fittings of LEGS and BOTTOM) have a 3 cm long piece of tube inside (for strength). Note
that they are not in the drawings !!
- Put the glue in the refrigerator before you use it. This will give you more time before the glue ...%#$&@
!!!
- The stated sizes are in Centi-Meters.
- All sizes are as used by me but could differ a little from buggy to buggy.
- Some sizes of the HEAD are left blank. Adjust them to your own body length.
Build & Glue sequence:
- The BOTTOM.
The first part you must make and glue. Glue it now. When it is dry remove the PVC between 90 and 210 degrees over
the total length of the bottom. Smooth the edges. It 'clicks' on the rear-axle when ready.
The BOTTOM is used as reference to get the best fit for the rest.
- The best FIT
Put all parts together on your buggy but don't glue !!!!!!!
Make corrections to the length of the tubes until all fits best to perfect on your buggy. Dis-assemble and try it
again.
- The LEG's. No comment, just glue.
- The HEAD.
Put all parts together on your buggy but don't glue !!!!!!!
Start at the top level of the HEAD and glue your way down to the lower level of the HEAD.
- The ASSEMBLY, part 1.
Put all parts together on your buggy before you glue the HEAD to the two T (45 degrees) fittings, all parts in
place !! Then glue your way to the bottom, but now ignore the legs.
You end up with the HEAD/BOTTOM assembly, without the LEG's glued to it.
- The ASSEMBLY, part 2.
Put the 2 LEGs and the BOTTOM/HEAD assembly together on your buggy.
Put pencil marks where the LEGs fit into the T (45 degrees) fittings.
Dis-assemble and glue together using the pencil marks as reference points.
Warnings:
- Read all before you start and ALWAYS do a test assembly before you glue.
- Although the PVC Glue does not harden in 10 seconds you have only ONE attempt to put it in
place. So do dry test assemblies before ....%#$&@ !!!
- PVC is NOT reliability. It will break. So no garantees and all at your own risk.
- De-grease and glue in a ventilated area. Preferable outside (in the cold).
Home
Some models.